Get started with the open-source Amazon SageMaker Distribution
Data scientists need a consistent and reproducible environment for machine learning (ML) and data science workloads that enables managing dependencies and is secure. AWS Deep Learning Containers already provides pre-built Docker images for training and serving models in common frameworks such as TensorFlow, PyTorch, and MXNet. To improve this experience, we announced a public beta of the SageMaker open-source distribution at 2023 JupyterCon. This provides a unified end-to-end ML experience across ML developers of varying levels of expertise. Developers no longer need to switch between different framework containers for experimentation, or as they move from local JupyterLab environments and SageMaker notebooks to production jobs on SageMaker. The open-source SageMaker Distribution supports the most common packages and libraries for data science, ML, and visualization, such as TensorFlow, PyTorch, Scikit-learn, Pandas, and Matplotlib. You can start using the container from the Amazon ECR Public Gallery starting today.
In this post, we show you how you can use the SageMaker open-source distribution to quickly experiment on your local environment and easily promote them to jobs on SageMaker.
For our example, we showcase training an image classification model using PyTorch. We use the KMNIST dataset available publicly on PyTorch. We train a neural network model, test the model’s performance, and finally print the training and test loss. The full notebook for this example is available in the SageMaker Studio Lab examples repository. We start experimentation on a local laptop using the open-source distribution, move it to Amazon SageMaker Studio for using a larger instance, and then schedule the notebook as a notebook job.
You can replace ECR_IMAGE_ID with any of the image tags available in the Amazon ECR Public Gallery, or choose the latest-gpu tag if you are using a machine that supports GPU.
This command will start JupyterLab and provide a URL on the terminal, like http://127.0.0.1:8888/lab?token=_<token>_. Copy the link and enter it in your preferred browser to start JupyterLab.
Studio is an end-to-end integrated development environment (IDE) for ML that lets developers and data scientists build, train, deploy, and monitor ML models at scale. Studio provides an extensive list of first-party images with common frameworks and packages, such as Data Science, TensorFlow, PyTorch, and Spark. These images make it simple for data scientists to get started with ML by simply choosing a framework and instance type of their choice for compute.
You can now use the SageMaker open-source distribution on Studio using Studio’s bring your own image feature. To add the open-source distribution to your SageMaker domain, complete the following steps:
Add the open-source distribution to your account’s Amazon Elastic Container Registry (Amazon ECR) repository by running the following commands on your terminal:
# Use the latest-cpu or latest-gpu tag based on your requirements
export ECR_GALLERY_IMAGE_ID='sagemaker-distribution:latest-cpu'
export SAGEMAKER_IMAGE_NAME='sagemaker-runtime'
export SAGEMAKER_STUDIO_DOMAIN_ID='d-xxxx'
export SAGEMAKER_STUDIO_IAM_ROLE_ARN='<studio-default-execution-role-arn>'

docker pull public.ecr.aws/sagemaker/$ECR_GALLERY_IMAGE_ID

export ECR_PRIVATE_REPOSITORY_NAME='sm-distribution'
export ECR_IMAGE_TAG='sagemaker-runtime-cpu'
export AWS_ACCOUNT_ID='0123456789'
export AWS_ECR_REPOSITORY_REGION='us-east-1'

# create repository
aws --region ${AWS_ECR_REPOSITORY_REGION} ecr create-repository --repository-name $ECR_PRIVATE_REPOSITORY_NAME
aws --region ${AWS_ECR_REPOSITORY_REGION} ecr get-login-password | docker login --username AWS --password-stdin ${AWS_ACCOUNT_ID}.dkr.ecr.${AWS_ECR_REPOSITORY_REGION}.amazonaws.com
export ECR_IMAGE_URI=$AWS_ACCOUNT_ID.dkr.ecr.$AWS_ECR_REPOSITORY_REGION.amazonaws.com/$ECR_PRIVATE_REPOSITORY_NAME:$ECR_IMAGE_TAG

# Tag
docker tag public.ecr.aws/sagemaker/$ECR_GALLERY_IMAGE_ID $ECR_IMAGE_URI
# Push the image to your private repository
docker push $ECR_IMAGE_URI
Create a SageMaker image and attach the image to the Studio domain:
# Create a SageMaker image
aws sagemaker create-image
    --image-name $SAGEMAKER_IMAGE_NAME
    --role-arn $SAGEMAKER_STUDIO_IAM_ROLE_ARN
# Create a SageMaker Image Version.
aws sagemaker create-image-version
    --image-name $SAGEMAKER_IMAGE_NAME
    --base-image $ECR_IMAGE_URI

# Optionally, describe the image version to ensure it's succesfully created
aws sagemaker describe-image-version
    --image-name $SAGEMAKER_IMAGE_NAME
    --version-number 1

# Create the app image configuration file
cat > /tmp/app-config.json << EOF
{
   "AppImageConfigName": "app-image-config-$SAGEMAKER_IMAGE_NAME",
   "KernelGatewayImageConfig": {
      "FileSystemConfig": {
         "DefaultGid": 100,
         "DefaultUid": 1000,
         "MountPath": "/home/sagemaker-user"
      },
      "KernelSpecs": [
         {
            "DisplayName": "Python 3 (ipykernel)",
            "Name": "python3"
         }
      ]
   }
}
EOF

# Create an Amazon SageMaker App Image Config.
aws sagemaker create-app-image-config
    --cli-input-json file:///tmp/app-config.json

# Create a default user settings file
# Update the file with your existing settings if you have additional custom images
cat > /tmp/default-user-settings.json << EOF
{
    "DefaultUserSettings": {
        "KernelGatewayAppSettings": {
            "CustomImages": [
                {
                    "ImageName": "$SAGEMAKER_IMAGE_NAME",
                    "AppImageConfigName": "app-image-config-$SAGEMAKER_IMAGE_NAME",
                    "ImageVersionNumber": 1
                }
            ]
        }
    }
}
EOF

# Update Amazon SageMaker Domain with the new default User Settings.
aws sagemaker update-domain
    --domain-id $SAGEMAKER_STUDIO_DOMAIN_ID
    --cli-input-json file:///tmp/default-user-settings.json
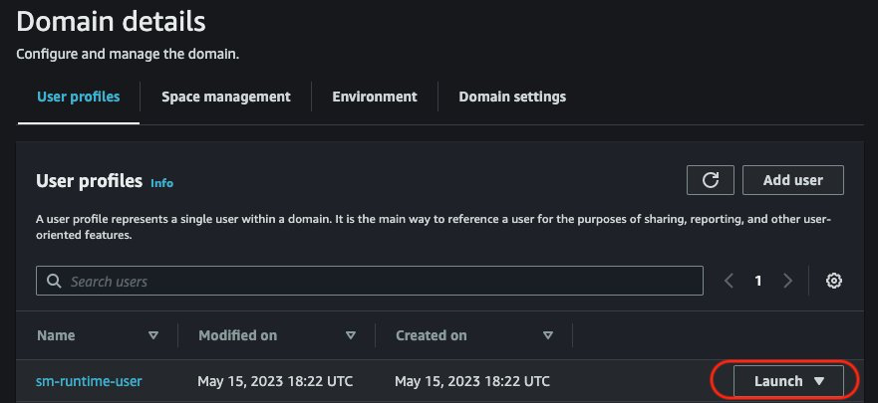
On the SageMaker console, launch Studio by choosing your domain and existing user profile.
Download the sample notebook locally from the GitHub repo.
Open the notebook in your choice of IDE and add a cell to the beginning of the notebook to install torchsummary. The torchsummary package is not part of the distribution, and installing this on the notebook will ensure the notebook runs end to end. We recommend using conda or micromamba to manage environments and dependencies. Add the following cell to the notebook and save the notebook:
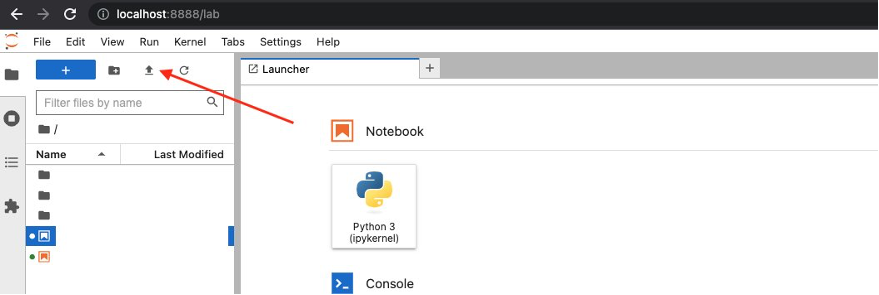
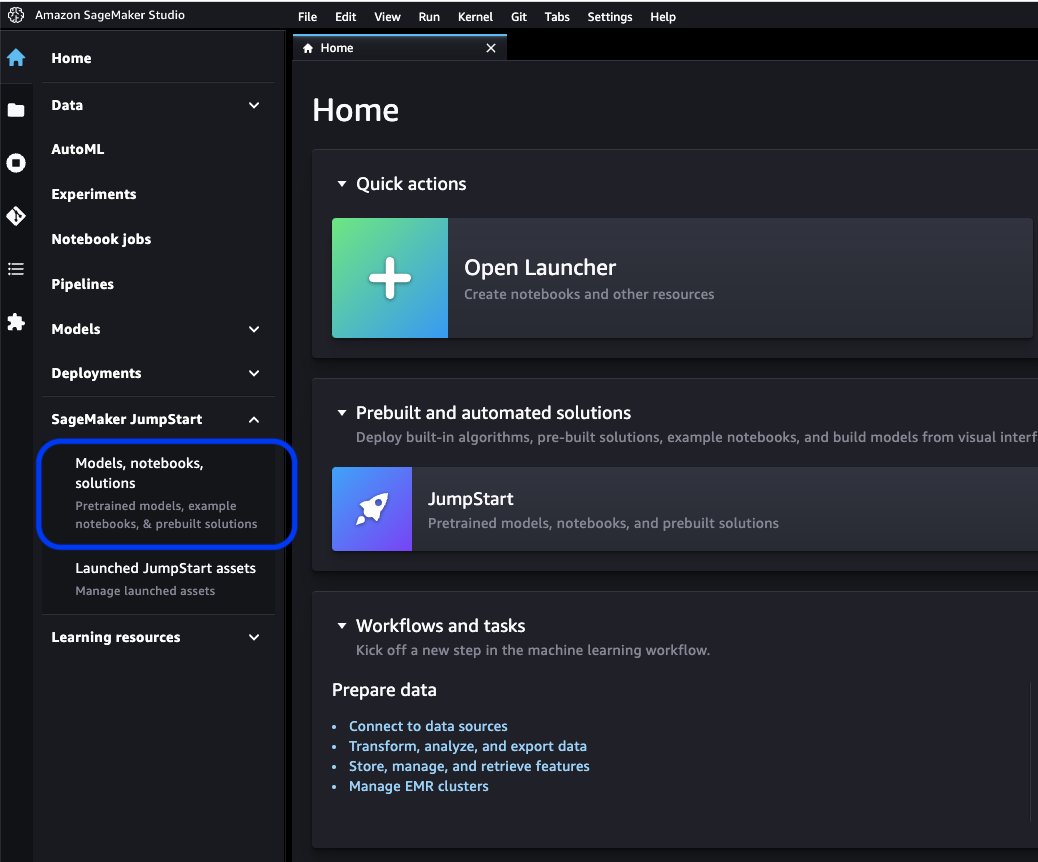
Upload the notebook to the JupyterLab UI you launched by choosing the upload icon as shown in the following screenshot.
When it’s uploaded, launch the cv-kmnist.ipynb notebook. You can start running the cells immediately, without having to install any dependencies such as torch, matplotlib, or ipywidgets.
If you followed the preceding steps, you can see that you can use the distribution locally from your laptop. In the next step, we use the same distribution on Studio to take advantage of Studio’s features.
Optionally, let’s promote the experimentation to Studio. One of the advantages of Studio is that the underlying compute resources are fully elastic, so you can easily dial the available resources up or down, and the changes take place automatically in the background without interrupting your work. If you wanted to run the same notebook from earlier on a larger dataset and compute instance, you can migrate to Studio.
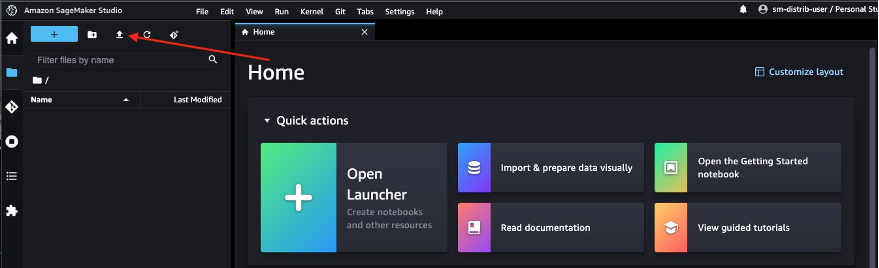
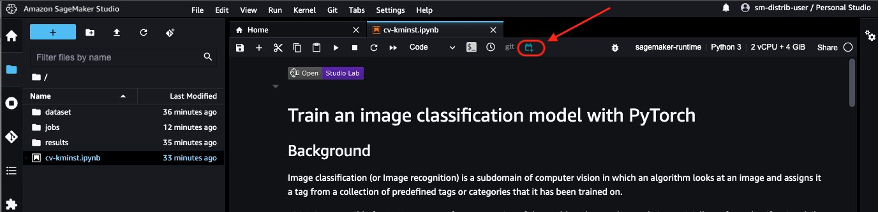
Navigate to the Studio UI you launched earlier and choose the upload icon to upload the notebook.
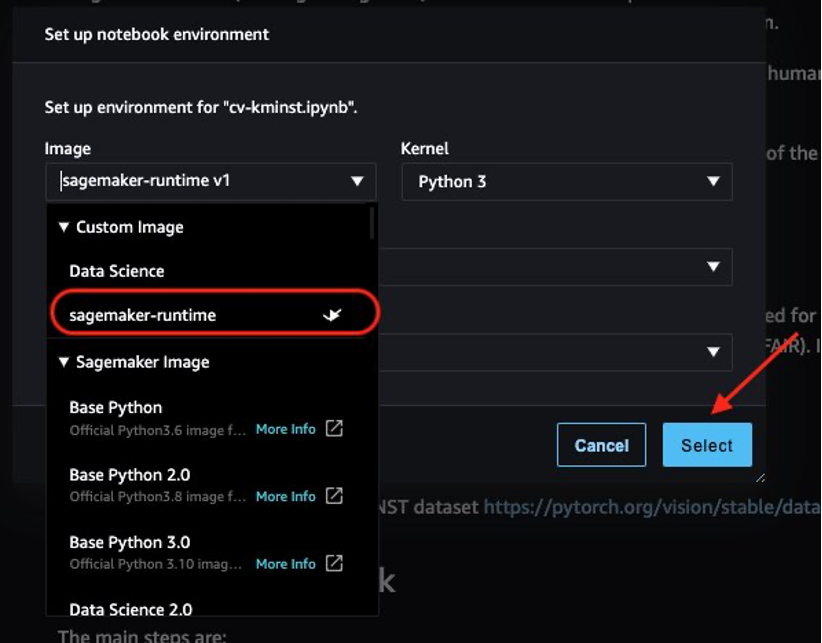
After you launch the notebook, you will be prompted to choose the image and instance type. On the kernel launcher, choose sagemaker-runtime as the image and an ml.t3.medium instance, then choose Select.
You can now run the notebook end to end without needing any changes on the notebook from your local development environment to Studio notebooks!
When you’re done with your experimentation, SageMaker provides multiple options to productionalize your notebook, such as training jobs and SageMaker pipelines. One such option is to directly run the notebook itself as a non-interactive, scheduled notebook job using SageMaker notebook jobs. For example, you might want to retrain your model periodically, or get inferences on incoming data periodically and generate reports for consumption by your stakeholders.
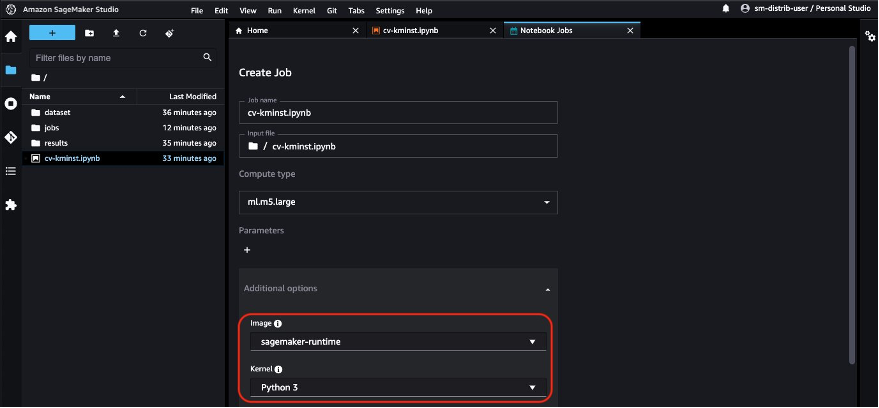
From Studio, choose the notebook job icon to launch the notebook job. If you have installed the notebook jobs extension locally on your laptop, you can also schedule the notebook directly from your laptop. See Installation Guide to set up the notebook jobs extension locally.
The notebook job automatically uses the ECR image URI of the open-source distribution, so you can directly schedule the notebook job.
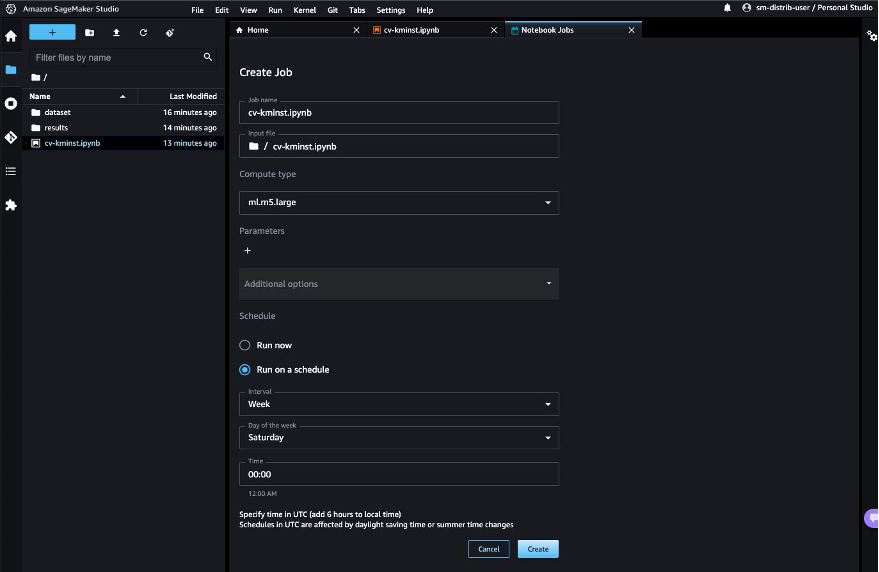
Choose Run on schedule, choose a schedule, for example every week on Saturday, and choose Create. You can also choose Run now if you’d like to view the results immediately.
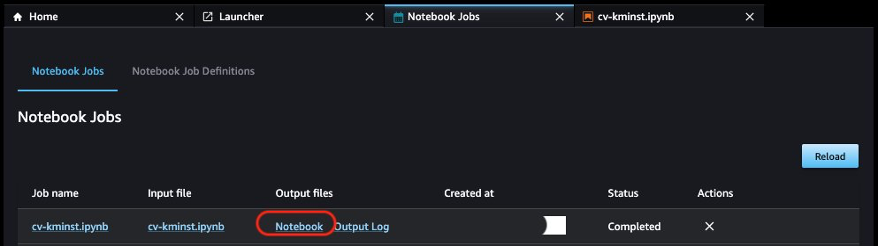
When the first notebook job is complete, you can view the notebook outputs directly from the Studio UI by choosing Notebook under Output files.
In addition to using the publicly available ECR image directly for ML workloads, the open-source distribution offers the following advantages:
The Dockerfile used to build the image is available publicly for developers to explore and build their own images. You can also inherit this image as the base image and install your custom libraries to have a reproducible environment.
If you’re not used to Docker and prefer to use Conda environments on your JupyterLab environment, we provide an env.out file for each of the published versions. You can use the instructions in the file to create your own Conda environment that will mimic the same environment. For example, see the CPU environment file cpu.env.out.
You can use the GPU versions of the image to run GPU-compatible workloads such as deep learning and image processing.
Complete the following steps to clean up your resources:
If you have scheduled your notebook to run on a schedule, pause or delete the schedule on the Notebook Job Definitions tab to avoid paying for future jobs.
Maintaining a reproducible environment across different stages of the ML lifecycle is one of the biggest challenges for data scientists and developers. With the SageMaker open-source distribution, we provide an image with mutually compatible versions of the most common ML frameworks and packages. The distribution is also open source, providing developers with transparency into the packages and build processes, making it easier to customize their own distribution.
In this post, we showed you how to use the distribution on your local environment, on Studio, and as the container for your training jobs. This feature is currently in public beta. We encourage you to try this out and share your feedback and issues on the public GitHub repository!
Durga Sury is an ML Solutions Architect on the Amazon SageMaker Service SA team. She is passionate about making machine learning accessible to everyone. In her 4 years at AWS, she has helped set up AI/ML platforms for enterprise customers. When she isn’t working, she loves motorcycle rides, mystery novels, and long walks with her 5-year-old husky.
Nous Research , the open-source artificial intelligence startup backed by crypto venture firm Paradigm , released a new competitive programming model on Monday
This post is co-written with Shashank Saraogi, Nat Gale, and Durran Kelly from INRIX. The complexity of modern traffic management extends far beyond mere road m
Large language models (LLMs) with billions of parameters are currently at the forefront of natural language processing (NLP). These models are shaking up the fi
AI is at a tipping point. We are seeing the impact of AI across more and more industries and use cases. Organizations with varying levels of ML expertise are so
Baseten is one of a growing number of AI infrastructure providers, helping other startups run their models and experiments at speed and scale. Given the importa
Editor’s note: This announcement was originally published on November 21, 2024, announcing the general availability of Mistral Large 24.11 on Vertex AI . This a