This blog post is co-written with George Orlin from Meta.
Today, we are excited to announce that Meta’s Segment Anything Model (SAM) 2.1 vision segmentation model is publicly available through Amazon SageMaker JumpStart to deploy and run inference. Meta SAM 2.1 provides state-of-the-art video and image segmentation capabilities in a single model. This cutting-edge model supports long-context processing, complex segmentation scenarios, and fine-grained analysis, making it ideal for automating processes for various industries such as medical imaging in healthcare, satellite imagery for environment monitoring, and object segmentation for autonomous systems. Meta SAM 2.1 is well suited for zero-shot object segmentation and accurate object detection based on simple prompts such as point coordinates and bounding boxes in a frame for video tracking and image masking.
This model was predominantly trained on AWS, and AWS will also be the first cloud provider to make it available to customers. In this post, we walk through how to discover and deploy the Meta SAM 2.1 model using SageMaker JumpStart.
Meta SAM 2.1 overview
Meta SAM 2.1 is a state-of-the-art vision segmentation model designed for high-performance computer vision tasks, enabling advanced object detection and segmentation workflows. Building upon its predecessor, version 2.1 introduces enhanced segmentation accuracy, robust generalization across diverse datasets, and scalability for production-grade applications. These features enable AI researchers and developers in computer vision, image processing, and data-driven research to improve tasks that require detailed analysis segmentation across multiple fields.
Meta SAM 2.1 has a streamlined architecture that is optimized for integration with popular model-serving frameworks like TorchServe and can be deployed on Amazon SageMaker AI to power real-time or batch inference pipelines. Meta SAM 2.1 empowers organizations to achieve precise segmentation outcomes in vision-centric workflows with minimal configuration and maximum efficiency.
Meta SAM 2.1 offers multiple variants—Tiny, Small, Base Plus, and Large—available now on SageMaker JumpStart, balancing model size, speed, and segmentation performance to cater to diverse application needs.
SageMaker JumpStart overview
SageMaker JumpStart offers access to a broad selection of publicly available foundation models (FMs). These pre-trained models serve as powerful starting points that can be deeply customized to address specific use cases. You can now use state-of-the-art model architectures, such as language models, computer vision models, and more, without having to build them from scratch.
With SageMaker JumpStart, you can deploy models in a secure environment. Models hosted on JumpStart can be provisioned on dedicated SageMaker Inference instances, including AWS Trainium and AWS Inferentia based instances, and are isolated within your virtual private cloud (VPC). This enforces data security and compliance, because the models operate under your own VPC controls, rather than in a shared public environment. After deploying an FM, you can further customize and fine-tune it using the extensive capabilities of SageMaker AI, including SageMaker Inference for deploying models and container logs for improved observability. With SageMaker AI, you can streamline the entire model deployment process.
Prerequisites
Make sure you have the following prerequisites to deploy Meta SAM 2.1 and run inference:
- An AWS account that will contain all your AWS resources.
- An AWS Identity and Access Management (IAM) role to access SageMaker AI. To learn more about how IAM works with SageMaker AI, refer to Identity and Access Management for Amazon SageMaker AI.
- Access to Amazon SageMaker Studio or a SageMaker notebook instance or an interactive development environment (IDE) such as PyCharm or Visual Studio Code. We recommend using SageMaker Studio for straightforward deployment and inference.
- Access to accelerated instances (GPUs) for hosting the model.
Discover Meta SAM 2.1 in SageMaker JumpStart
SageMaker JumpStart provides FMs through two primary interfaces: SageMaker Studio and the SageMaker Python SDK. This provides multiple options to discover and use hundreds of models for your specific use case.
SageMaker Studio is a comprehensive IDE that offers a unified, web-based interface for performing all aspects of the machine learning (ML) development lifecycle. From preparing data to building, training, and deploying models, SageMaker Studio provides purpose-built tools to streamline the entire process. In SageMaker Studio, you can access SageMaker JumpStart to discover and explore the extensive catalog of FMs available for deployment to inference capabilities on SageMaker Inference.
You can access the SageMaker JumpStart UI through either Amazon SageMaker Unified Studio or SageMaker Studio. To deploy Meta SAM 2.1 using the SageMaker JumpStart UI, complete the following steps:
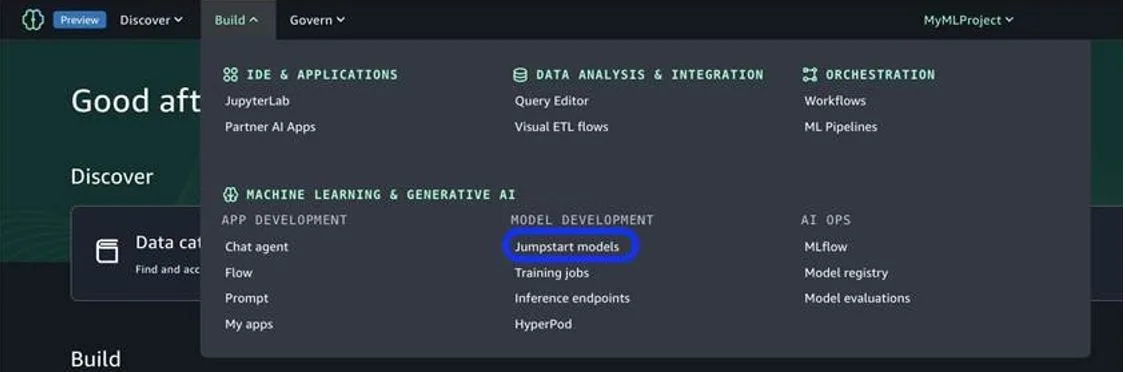
In SageMaker Unified Studio, on the Build menu, choose JumpStart models.

If you’re already on the SageMaker Studio console, choose JumpStart in the navigation pane.

You will be prompted to create a project, after which you can begin deployment.
Alternatively, you can use the SageMaker Python SDK to programmatically access and use SageMaker JumpStart models. This approach allows for greater flexibility and integration with existing AI/ML workflows and pipelines. By providing multiple access points, SageMaker JumpStart helps you seamlessly incorporate pre-trained models into your AI/ML development efforts, regardless of your preferred interface or workflow.
Deploy Meta SAM 2.1 for inference using SageMaker JumpStart
On the SageMaker JumpStart landing page, you can discover the public pre-trained models offered by SageMaker AI. You can choose the Meta model provider tab to discover the Meta models available.
If you’re using SageMaker Studio and don’t see the SAM 2.1 models, update your SageMaker Studio version by shutting down and restarting. For more information about version updates, refer to Shut down and Update Studio Classic Apps.

You can choose the model card to view details about the model such as license, data used to train, and how to use. You can also find two buttons, Deploy and Open Notebook, which help you use the model.

When you choose Deploy, you should be prompted to the next screen to choose an endpoint name and instance type to initiate deployment.

Upon defining your endpoint settings, you can proceed to the next step to use the model.
Deploy Meta SAM 2.1 vision segmentation model for inference using the Python SDK
When you choose Deploy, model deployment will start. Alternatively, you can deploy through the example notebook by choosing Open Notebook. The notebook provides end-to-end guidance on how to deploy the model for inference and clean up resources.
To deploy using a notebook, you start by selecting an appropriate model, specified by the model_id. You can deploy any of the selected models on SageMaker AI.
You can deploy a Meta SAM 2.1 vision segmentation model using SageMaker JumpStart with the following SageMaker Python SDK code:
This deploys the model on SageMaker AI with default configurations, including default instance type and default VPC configurations. You can change these configurations by specifying non-default values in JumpStartModel. After it’s deployed, you can run inference against the deployed endpoint through the SageMaker predictor. There are three tasks that are available with this endpoint: automatic mask generator, image predictor, and video predictor. We provide a code snippet for each later in this post. To use the predictor, a certain payload schema needs to be followed. The endpoint has sticky sessions enabled, so to start inference, you need to send a start_session payload:
The start_session invocation needs an input media type of either image or video and the base64 encoded data of the media. This will launch a session with an instance of the model and load the media to be segmented.
To close a session, send a close_session invocation:
If x-amzn-sagemaker-closed-session-id exists as a header, then the session has been successfully closed.
To continue a session and retrieve the session ID of the existing session, the response header will have the x-amzn-sagemaker-session-id key with the current session ID for any operation that is not start_session or close_session. Operations that aren’t start_session or close_session need to be invoked with a response stream. This is due to the size of the resulting payload being larger than what SageMaker real-time endpoints can return.
This is a basic example of interacting with the SAM 2.1 SageMaker JumpStart endpoint with sticky sessions. The following examples for each of the tasks reference these operations without repeating them. The returned data is of mime type JSONL. For more complete examples, refer to the example notebooks for Meta SAM 2.1 on SageMaker Jumpstart.
Recommended instances and benchmarks
The following table lists all the Meta SAM 2.1 models available in SageMaker JumpStart along with the model_id, default instance types, and maximum number of total tokens (sum of number of input tokens and number of generated tokens) supported for each of these models. For increased context length, you can modify the default instance type in the SageMaker JumpStart UI.
| Model Name | Model ID | Default Instance Type | Supported Instance Types |
| Meta SAM 2.1 Tiny | meta-vs-sam-2-1-hiera-tiny | ml.g6.24xlarge (5.5 MB total image or video size) | ml.g5.24xlarge ml.g5.48xlarge ml.g6.24xlarge ml.g6.48xlarge ml.p4d.24xlarge ml.p4de.24xlarge |
| Meta SAM 2.1 Small | meta-vs-sam-2-1-hiera-small | ml.g6.24xlarge (5.5 MB total image or video size) | ml.g5.24xlarge ml.g5.48xlarge ml.g6.24xlarge ml.g6.48xlarge ml.p4d.24xlarge ml.p4de.24xlarge |
| Meta SAM 2.1 Base Plus | meta-vs-sam-2-1-hiera-base-plus | ml.g6.24xlarge (5.5 MB total image or video size) | ml.g5.24xlarge ml.g5.48xlarge ml.g6.24xlarge ml.g6.48xlarge ml.p4d.24xlarge ml.p4de.24xlarge |
| Meta SAM 2.1 Large | meta-vs-sam-2-1-hiera-large | ml.g6.24xlarge (5.5 MB total image or video size) | ml.g5.24xlarge ml.g5.48xlarge ml.g6.24xlarge ml.g6.48xlarge ml.p4d.24xlarge ml.p4de.24xlarge |
Meta SAM 2.1 use cases: Inference and prompt examples
After you deploy the model using SageMaker JumpStart, you should be able to see a reference Jupyter notebook that references the parser and helper functions needed to begin using Meta SAM 2.1. After you follow those cells in the notebook, you should be ready to begin using the model’s vision segmentation capabilities.
Meta SAM 2.1 offers support for three different tasks (automatic mask generator, image predictor, video predictor) to generate masks for various objects in images, including object tracking in videos. In the following examples, we demonstrate how to use the automatic mask generator and image predictor on a JPG of a truck. This truck.jpg file is stored in the jumpstart-cache-prod bucket; you can access it with the following code:
After you have your image and it is encoded, you can create masks for objects in the image. For use cases where you want to generate masks for every object in the image, you can use the automatic mask generator task.
Automatic mask generator
The automatic mask generator is great for AI researchers for computer vision tasks and applications such as medical imaging and diagnostics to automatically segment regions of interest like tumors or specific organs to provide more accurate diagnostic support. Additionally, the automatic mask generator can be particularly useful in the autonomous vehicle space, in which it can segment out elements in a camera like pedestrians, vehicles, and other objects. Let’s use the automatic mask generator to generate masks for all the objects in truck.jpg.

The following code is the prompt to generate masks for your base64 encoded image:
We receive the following output (parsed and visualized).

Image predictor
Additionally, you can choose which objects in the provided image you want to create a mask for by adding points within that object for Meta SAM 2.1 to create. A use case for the image predictor can be valuable for tasks related to design and modeling by automating processes that typically require manual efforts. For example, the image predictor can automate turning 2D images into 3D models by analyzing 2D images of blueprints, sketches, or floor plans and generating preliminary 3D models. This is one of many examples of how the image predictor can act as a bridge between 2D and 3D construction across many different tasks. We use the following image with the points that we used to prompt Meta SAM 2.1 for masking the object.

The following code is used to prompt Meta SAM 2.1 and plot the coordinates:
We receive the following output (parsed and visualized).
Video predictor
We now demonstrate how to prompt Meta SAM 2.1 for object tracking on video. One use case would be for ergonomic data collection and training purposes. You can use the video predictor to analyze the movement and posture of humans in real time, serving as a way to reduce injury and improve performance by setting alarms for bad posture or movements. Let’s start by accessing the basketball-layup.mp4 file [1] from the jumpstart-cache-prod S3 bucket defined in the following code:
Video:
The following code shows how you can set up the prompt format to track objects in the video. The first object will use coordinates to track and not track, and the second object will track one coordinate.
We receive the following output (parsed and visualized).
Video:
Here we can see that Meta SAM 2.1 Tiny was able to successfully track the objects based off the coordinates that were provided in prompt.
Clean up
To avoid incurring unnecessary costs, when you’re done, delete the SageMaker AI endpoints using the following code:
Alternatively, to use the SageMaker AI console, complete the following steps:
- On the SageMaker AI console, under Inference in the navigation pane, choose
- Search for the embedding and text generation endpoints.
- On the endpoint details page, choose Delete.
- Choose Delete again to confirm.
Conclusion
In this post, we explored how SageMaker JumpStart empowers data scientists and ML engineers to discover, access, and deploy a wide range of pre-trained FMs for inference, including Meta’s most advanced and capable models to date. Get started with SageMaker JumpStart and Meta SAM 2.1 models today. For more information about SageMaker JumpStart, see SageMaker JumpStart pretrained models and Getting started with Amazon SageMaker JumpStart.
Sources:
[1] Erčulj F, Štrumbelj E (2015) Basketball Shot Types and Shot Success in Different Levels of Competitive Basketball. PLOS ONE 10(6): e0128885. https://doi.org/10.1371/journal.pone.0128885
About the Authors
 Marco Punio is a Sr. Specialist Solutions Architect focused on generative AI strategy, applied AI solutions, and conducting research to help customers hyper-scale on AWS. As a member of the 3rd Party Model Provider Applied Sciences Solutions Architecture team at AWS, he is a Global Lead for the Meta – AWS Partnership and technical strategy. Based in Seattle, WA, Marco enjoys writing, reading, exercising, and building applications in his free time.
 Deepak Rupakula is a Principal GTM lead in the specialists group at AWS. He focuses on developing GTM strategy for large language models like Meta across AWS services like Amazon Bedrock and Amazon SageMaker AI. With over 15 years of experience in the tech industry, his experience includes leadership roles in product management, customer success, and analytics.
 Harish Rao is a Senior Solutions Architect at AWS, specializing in large-scale distributed AI training and inference. He empowers customers to harness the power of AI to drive innovation and solve complex challenges. Outside of work, Harish embraces an active lifestyle, enjoying the tranquility of hiking, the intensity of racquetball, and the mental clarity of mindfulness practices.
 Baladithya Balamurugan is a Solutions Architect at AWS focused on ML deployments for inference and using AWS Neuron to accelerate training and inference. He works with customers to enable and accelerate their ML deployments on services such as Amazon SageMaker AI and Amazon EC2. Based in San Francisco, Baladithya enjoys tinkering, developing applications, and building his homelab in his free time.
 Banu Nagasundaram leads product, engineering, and strategic partnerships for Amazon SageMaker JumpStart, SageMaker AI’s machine learning and generative AI hub. She is passionate about building solutions that help customers accelerate their AI journey and unlock business value.
 Naman Nandan is a software development engineer at AWS, specializing in enabling large-scale AI/ML inference workloads on Amazon SageMaker AI using TorchServe, a project jointly developed by AWS and Meta. In his free time, he enjoys playing tennis and going on hikes.