This post was co-authored with Mark Lott, Distinguished Technical Architect, Salesforce, Inc.
Enterprises that operate globally are experiencing challenges sourcing customer support professionals with multi-lingual experience. This process can be cost-prohibitive and difficult to scale, leading many enterprises to only support English for chats. Using human interpreters for translation support is expensive, and infeasible since chats need real-time translation. Adding multi-lingual machine translation to these customer support chat workflows provides cost-effective, scalable options that improve the customer experience by providing automated translations for users and agents, create an inclusive customer experience, and improve brand loyalty.
Amazon Translate is a neural machine translation service that delivers fast, high-quality, affordable, and customizable language translation. Service Cloud by Salesforce is one of the world’s most popular and highly rated customer service software solutions. Whether by phone, web, chat, or email, this customer support software enables agents and customers to quickly connect and solve customer problems. AWS and Salesforce have been in a strategic partnership since 2016, and are working together to innovate on behalf of customers.
In this post, we demonstrate how to link Salesforce and AWS in real time and use Amazon Translate from within Service Cloud.
Solution overview
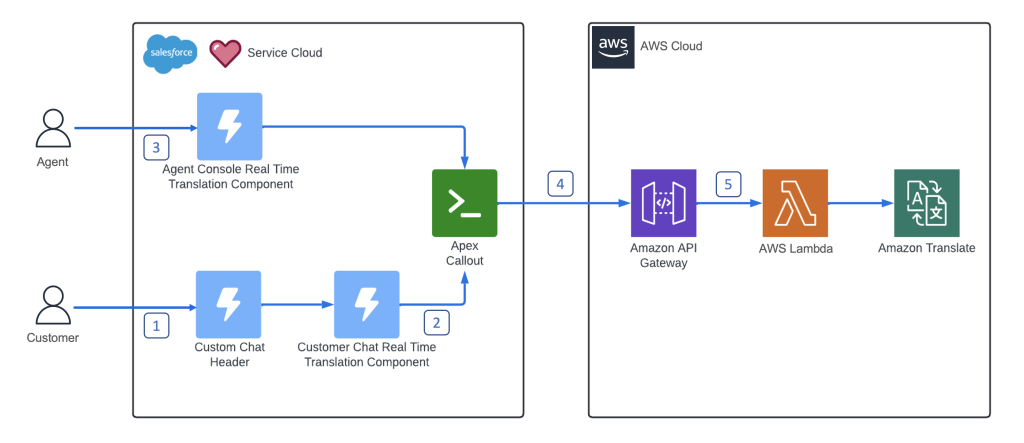
The following diagram shows the solution architecture.

There are two personas. The contact center agent persona uses the Service Cloud console, and the customer persona initiates the chat session via a customer support portal enabled by Salesforce Experience Cloud.
The solution is composed of the following components:
- A Lightning Web Component that implements a custom header for the customer chat. This component lets the customer toggle between languages.
- A Lightning Web Component that overrides the chat for the customer and invokes Amazon Translate to translate the text in real time. This is also referred to as a snap-in.
- An Aura-based web component that provides real-time chat translation services to the call center agent.
- A Salesforce Apex Callout class, which makes real-time calls to AWS to translate chat messages for the agent and the customer.
- Amazon API Gateway with AWS Lambda integration that converts the input text to the target language using the Amazon Translate SDK.
Prerequisites
This solution has the following prerequisites:
- An AWS account. If you don’t have one, sign up at https://aws.amazon.com.
- The AWS Cloud Development Kit (AWS CDK) installed and the AWS Command Line Interface (AWS CLI) version 2 installed.
- A Salesforce Trailhead account associated with your Salesforce Developer Edition org.
- Salesforce Code Builder. For installation instructions, refer to Set Up Code Builder.
- Node.js and the npm command line interface.
- Docker.
Deploy resources using the AWS CDK
You can deploy the resources using the AWS CDK, an open-source development framework that lets developers define cloud resources using familiar programming languages. The following steps set up API Gateway, Lambda, and Amazon Translate resources using the AWS CDK. It may take up to 15 minutes to complete the deployment.
- From a command prompt, run the following commands:
- Take note of the API key and the API endpoint created during the deployment. You need those values later when configuring Salesforce to communicate with API Gateway.
Configure Salesforce Service Cloud
In this section, you use the Service Setup Assistant to enable an out-of-the-box Service Cloud app with optimal settings and layouts. To configure Service Cloud, complete the following steps:
- Log in to your Salesforce org, choose the gear icon, and choose Service Setup (the purple gear icon).
- Under Open the Service Setup Assistant, choose Go to Assistant.
- On the Service Setup Assistant page, in the Turn on your Service app section, toggle Service Setup Assistant to On.
This process may take a couple of minutes to complete. You can choose Check Status to see if the job is finished.
- When the status shows Ready, choose Get Started.
- Choose Yes, Let’s Do It.
- Ignore the Personalize Service section.
At this point, we have enabled Service Cloud.
Enable Salesforce Sites
Salesforce Sites lets you create public websites that are integrated with your Salesforce org. In this step, you register a Salesforce Sites domain, which you customize to embed a chat component that allows the customer persona to engage with the agent. To enable Salesforce Sites, complete the following steps:
- Log in to your Salesforce org.
- Choose the gear icon and choose Setup.
- Under User Interface, choose Sites and Domains, then choose Sites.
- Select the check box accepting the Sites terms of service and choose Register My Salesforce Site Domain.
- If a pop-up window appears, choose OK.
- Make a note of the URL under Sample Domain Name. You need this information in the next step.
Configure Salesforce Chat
In this step, you use Service Setup to configure Salesforce Chat. This walks you through a setup wizard to create chat queues, a team that the agent belongs to, and prioritization. To configure Salesforce Chat, complete the following steps:
- Choose the gear icon and choose Service Setup.
- Within the Service Setup home page, choose View All under Recommended Setup.
A dialog box opens with a list of configuration wizards.
- Choose the Chat with Customers configuration wizard, either by scrolling down or entering chat in the search box, then choose Start.
- In the Create a chat queue section, enter
ChatQueuefor Queue Name, andChat Teamfor Name This Group. - Select yourself as a member of the chat team and choose Next.
This allows your developer edition user account to be an agent within the Service Console.
- In the Prioritize chats with your other work section, set the ChatQueue priority to 1 and choose Next.
- In the Adjust your agents’ chat workload section, accept the defaults and choose Next.
- In the Let’s make chat work on your website section, enter the URL you saved (add
https://) and choose Next. - In the What’s your type? section, choose Just Contacts, then choose Next.
- In the In case your team’s busy section, accept the defaults and choose Next.
You don’t need the code snippet because we will drag and drop the predefined chat component in the next section.
- Choose Next followed by Done.
Configure your customer support digital experience
In this section, you configure the digital experience (the customer persona’s view) to embed a chat widget that the customer will use when they need help. To configure the digital experience, complete the following steps:
- Choose the gear icon followed by Setup.
- Under Digital Experiences, choose All Sites.
- In the Action column under All Sites, choose the Builder link.
- In the navigation pane, choose Components, and search for chat.
- Drag Embedded Service Chat to the Content Footer section, which requires you to scroll the window while dragging.
- You may see a pop-up indicating you cannot access the resources due to a Content Security Policy (CSP) issue. Ignore these errors, and choose OK. We will address these errors in the next step.

- Choose the settings gear in the navigation pane, then choose Security & Privacy.
- Under Content Security Policy (CSP), change Security Level to Relaxed CSP.
- Accept any pop-ups asking confirmation and ignore any errors.
- Under CSP Errors, identify the blocked resources, choose the Allow URL, and choose Allow on any confirmation dialog. This gets rid of the CSP error pop-ups.

- Close the security setting screen, then choose Publish, then Got it in the resultant dialog.
- If you continue to get CSP errors, go back to the security settings and manually choose Allow URL for the sites that were blocked under CSP Errors.
- Choose the Workspaces icon.
- Choose Administration.
- Choose Settings, then choose Activate, followed by OK.
Customize Salesforce Chat
You add yourself as a valid user for the CodeBuilder permission set, which lets you create and launch a Salesforce Code Builder project. You then deploy the customizations using the Salesforce CLI. Finally, you (unit) test that the translation is working as intended. To customize chat, complete the following steps:
- Choose the gear icon and choose Setup.
- Search for
Permission Setsand then choose CodeBuilder on the Permission Sets page. - Choose Manage Assignments, followed by Add Assignments.
- Choose yourself by selecting your name or login.
- Choose Next, then Assign, then Done.
Your name is now listed under Current Assignments.
- Under App Launcher, choose Code Builder (Beta).
- Choose Get Started, followed by New Project.
- Enter
amazon-translate-servicefor Project Name andEmptyfor Project Type. - Choose Next.
- Choose Connect a Development Org, then choose Next.
- If prompted, log in again using the credentials for your development org.
- Enter
amazon-translate-servicefor Org Alias and choose Create.
It takes a few minutes to create the environment.
- When the environment is available, choose Launch.
- On the Terminal tab, enter the following commands:
- In the navigation pane, open and edit the file
force-app/main/default/externalCredentials/TranslationServiceExtCred.externalCredential-meta.xml. - Replace
parameterValueof the AuthHeader parameterType to your API key. - Save the file.
- Edit the file
force-app/main/default/namedCredentials/ TranslateService.namedCredential-meta.xml. - Replace
parameterValueof the UrlparameterTypewith your API Gateway URL. - Save the file.
- On the Terminal tab, enter the following commands:
The first command pushes the code and metadata into your Salesforce developer environment:
The second command runs a script that assigns your user to a permission set within your Salesforce developer environment. Each user has to be authorized to use the named credential, which contains the information necessary to connect to AWS.
The last command runs a script that tests the integration between your Salesforce developer environment and the Amazon Translate service. If everything is configured correctly and deployed successfully, you will see that Salesforce can now call Amazon Translate.
Now that we’ve configured, pushed, and tested the project, it’s time to configure the Salesforce user interface to include the translation web components.
- Choose the gear icon and choose Setup.
- Under Service, choose Embedded Service, then choose Embedded Service Deployments.
- For Chat Team, choose View.
- For Chat Settings¸ choose Edit.
- Under Customize with Lightning Components, choose Edit.
- Choose
translationHeaderSnapinfor Chat Header andtranslationSnapinfor Chat Messages (Text). - Choose Save.
Configure the components in the Agent’s desktop interface
You now create a new Lightning app page and add a custom component that displays the translated customer’s messages. To configure agent’s desktop interface, complete the following steps:
- Choose the gear icon and choose Setup.
- Choose User Interface, then Lightning App Builder.
- Choose New in the Lightning Pages section.
- Choose Record Page, then choose Next.
- Choose Translation Chat Transcript for Label and Chat Transcript for Object.
- Choose Next.
- Choose Header and Two Equal Regions as the page template and choose Finish.
- Drag the Conversation component into the left-hand view and the TranslationReceiver component into the right-hand view.
- Choose Save, then choose Activate.
- Choose Assign as Org Default, then choose Desktop, and Next.
- Review the assignment and choose Save.
- Exit from the Lightning App Builder by choosing Save.
Test the translation feature
It’s time to test this feature. It’s easy to test by having two browsers side by side. The first browser is set up as the agent, and the second one as the customer. Make sure you toggle the customer persona’s language as a language other than English, and initiate the chat by choosing Chat with an Expert. Complete the following steps to initiate a conversation:
- Under App Launcher, choose Service Console.
- Choose Omni-Channel to open the agent interface.
- Make yourself available by choosing Available – Chat as your status.
- Open a separate tab or browser and choose Setup.
- Choose Digital Experiences, then All Sites.
- Choose the URL to launch the customer view.
- Choose Chat with an Expert, and choose the language as es in the drop-down menu at the top of the Chat pane.
- Provide your name and email.
- Choose Start Chatting.
- Go to the agent tab and accept the incoming chat.
- You can now chat back and forth as a customer speaking Spanish or other supported language and the agent speaking English.
Clean up
To clean up your resources, complete the following steps:
- Run
cdk destroyto delete the provisioned resources. - Follow the instructions in Deactivate a Developer Edition Org to deactivate your Salesforce Developer org.
Conclusion
In this post, we demonstrated how you can set up and configure real-time translations powered by Amazon Translate for Salesforce Service Cloud chat conversations. The combination of Salesforce Service Cloud and Amazon Translate enables a scalable, cost-effective solution for your customer support agents to communicate in real time with customers in their preferred languages. Amazon Translate can help you scale this solution to support over 5,550 translation pairs out of the box.
For more details about Amazon Translate, visit Amazon Translate resources to find video resources and blog posts, and also refer to Amazon Translate FAQs. If you’re new to Amazon Translate, try it out using the Free Tier, which offers up to 2 million characters per month for free for the first 12 months, starting from your first translation request.
About the Authors
 Mark Lott is a Distinguished Technical Architect at Salesforce. He has over 25 years working in the software industry and works with customers of all sizes to design custom solutions using the Salesforce platform.
 Kishore Dhamodaran is a Senior Solutions Architect at AWS. Kishore helps strategic customers with their cloud enterprise strategy and migration journey, leveraging his years of industry and cloud experience.
 Tim McLaughlin is a Product Manager at Amazon Web Services in the AWS Language AI Services team. He works closely with customers around the world by supporting their AWS adoption journey with Language AI services.
 Jared Wiener is a Solutions Architect at AWS.